

Blower Door Testing
Standardised airtightness testing using a calibrated blower door fan to quantify how much air a building leaks at a reference pressure of 50 Pascals.
One process — every service is a stage of it.
We never jump to a fix. We investigate and measure, diagnose the real cause, design the solution, carry out the works and verify the result.


Real photos from a recent blower door airtightness test.
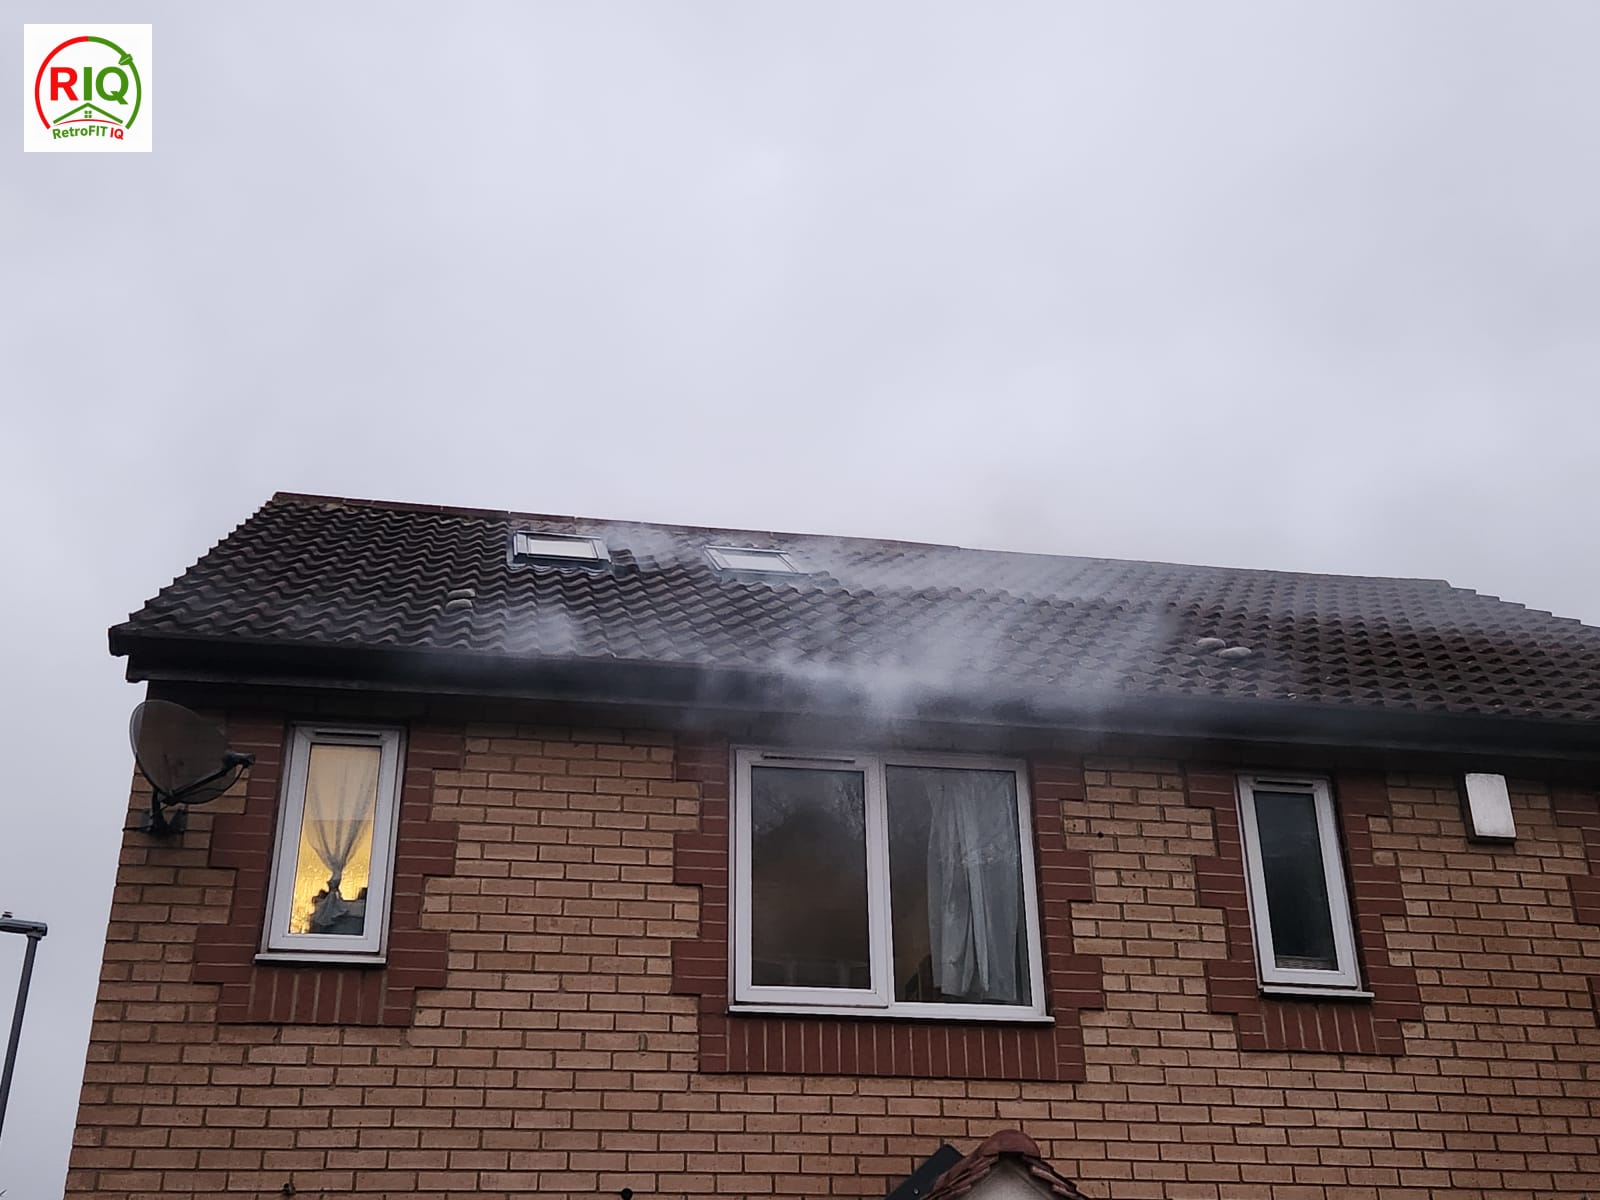
Smoke escaping at the eaves during a real blower door test — air-leakage path made visible.
Blower Door Testing — in plain English.
A blower door test fits a calibrated fan into an external door, pressurises (or depressurises) the building, and measures how much air leaks through the envelope. The result is an air change rate at 50 Pa (ACH₅₀) and a measured airflow (m³/h) — the same metric used in Passive House and Part L compliance.
Why blower door testing is important.
Uncontrolled air leakage is one of the largest hidden heat losses in UK homes and a primary driver of draughts, cold spots and interstitial condensation — yet it is invisible until it is measured. A blower door test quantifies airtightness in ACH₅₀ and, paired with smoke and thermal imaging, locates every meaningful leakage path. This matters because insulation cannot perform if cold air bypasses it, and an MVHR system cannot balance if the envelope leaks. Airtightness is therefore both an energy measure and a moisture-safety measure, and the only way to manage it is to test it.
The right time to bring us in.
- Before air-sealing or insulation, to find and prioritise the leakage paths
- On new builds, to verify Part L airtightness and avoid a late-stage failure
- For Passive House or EnerPHit certification, where a measured result is mandatory
- Before commissioning MVHR, to confirm the envelope is tight enough for it to balance
- After sealing works, to verify and document the improvement
The symptoms that bring people to this service.
- 01Cold draughts you can feel even with the heating on
- 02Sounds (and smells) bleeding through between flats
- 03New-build air-tightness failing Part L
- 04Energy bills 20–40% higher than expected
- 05Uncontrolled air-leakage undermining a brand-new MVHR system
- 06Hidden bypass paths in lofts, service penetrations and intermediate floors
What you tend to notice first.
- Cold draughts you can feel even with the heating running
- Energy bills 20–40% higher than expected for the property type
- A new MVHR system that is not delivering the comfort it should
- Sounds and smells passing between flats or rooms
- A new build failing, or at risk of failing, Part L airtightness
- Cold spots and condensation in lofts, service voids and intermediate floors
Our diagnostic approach
- 01Pre-test walkthrough — seal intentional openings (vents, flues, MVHR)
- 02Pressurisation + depressurisation test (typically 25–70 Pa range, single-point and multi-point)
- 03Simultaneous smoke tracing to visualise the actual leakage paths
- 04Thermal imaging under depressurisation to confirm cold-air ingress
- 05Itemised leak inventory with photos, locations and remediation priorities
What we bring on site
- Minneapolis-style calibrated blower door fan + frame + shroud
- Manometer / pressure transducer with software logging (TECTITE / TEC ducted air-flow analyser equivalent)
- Smoke tracer pen / theatrical fog machine for leak visualisation
- FLIR thermal camera for paired thermal-under-pressure imaging
- Anemometer for spot velocity readings at suspect leakage points
The science behind the diagnosis.
Air movement through the envelope carries heat (convective loss), moisture (vapour) and noise. Pressurising the building amplifies pressure differences across every crack, gap and penetration, so even a 1 mm gap that's invisible under normal conditions becomes a measurable, locatable air-leakage path. That's how you separate symptom from cause.
Measured benefits — not vague promises.
- Measured airtightness in ACH₅₀ / m³/h — not assumed
- Locate every meaningful air-leakage path with smoke + thermal evidence
- Quantify the heating-energy penalty of uncontrolled infiltration
- Verify that MVHR will actually deliver controlled, balanced ventilation
- Provide compliance evidence for Part L, Passive House, AECB and Enerphit
What we design and deliver next.
Every recommendation follows our methodology — Investigate → Design → Verify — so the diagnosis on this page leads directly into an engineered, buildable and independently verified solution.
- A prioritised air-sealing plan targeting the largest measured leakage paths first
- Continuous air-barrier detailing at junctions, penetrations and openings
- Sealing works sequenced beneath insulation, not bolted on afterwards
- MVHR or controlled ventilation matched to the achieved airtightness
- A measured target (e.g. 3–5 ACH₅₀ for retrofit, ≤1.0 for EnerPHit) to design towards
- A post-works re-test to verify and document the improvement
What goes wrong on site — and why it matters.
Our diagnoses are grounded in real site experience. These are the workmanship and detailing failures we repeatedly find on this kind of work — the difference between a building that should perform and one that actually does.
Membranes and VCLs lapped but not taped, or stopped short at a junction, leave the air barrier open exactly where it needs to be continuous.
Waste pipes, soil stacks, cables and ducts passing through the air barrier without a grommet or tape are among the largest single leaks we find.
Where a parge coat or continuous bead is missing, air loops behind the board and leaks at the floor and ceiling edges.
The junction between window/door frames and the structural opening is a routine leakage path when expanding foam is used without an airtight tape.
Joist ends open to a cavity create a flanking path that lets air bypass the air barrier between storeys.
Where it's used
- New-build airtightness verification
- Passive House and EnerPHit certification testing
- Pre-retrofit baseline measurement
- Post-retrofit verification of airtightness improvements
- Diagnosing draughts, cold spots and ventilation imbalance
What you receive
- Measured air-change rate (ACH₅₀ or m³/h·m² at 50 Pa)
- Smoke tracing to locate dominant leakage paths
- Targeted recommendations to reduce air leakage
- Optional re-test to verify improvements
What we commonly discover during blower door testing investigations
- 01Loft hatch and ceiling penetrations leaking at >10× allowed rate
- 02Window and door reveals leaking around poorly sealed perimeters
- 03Service penetrations (waste pipes, cables) unsealed at external walls
- 04Suspended ground-floor perimeters open to ventilated subfloor voids
- 05Chimney flues and party-wall bypasses acting as constant leakage paths
- 06Smoke tracing visualises every leak pathway — quantified at 50 Pa
Findings reflect patterns observed across completed RetrofitIQ projects — every survey is interpreted in the building’s specific context.
See this service applied on real investigations
Blower Door Testing — common questions
What is a blower door test?+
A blower door test is a controlled pressurisation/depressurisation test that measures how airtight a building is. A calibrated fan is fitted into an external doorway; the house is pressurised (or depressurised) to a known pressure difference against the outside (typically 50 Pascals); and the airflow required to hold that pressure is measured. The result tells you exactly how leaky your building is — in litres-per-second per square metre or air-changes-per-hour.How does a blower door test identify air leakage?+
Under depressurisation, every gap, crack, service penetration and unsealed junction in the building envelope becomes an air leakage path with outside air rushing in. We use a smoke pen at suspected points to make those leakage paths visible, and a thermal camera to show them as cold fingers of incoming air. The combined output is a measured leak inventory — a list of every meaningful air leakage path with its location and severity.Why is the test carried out at 50 Pascals?+
50 Pa is the industry-standard reference pressure used in ATTMA TSL1 (UK), the Passive House Institute, Approved Document L (England) and the international ISO 9972 / EN 13829 protocols. At 50 Pa the airflow signal is strong enough to drown out wind and stack-effect noise, but well below any pressure that could damage the building. It also enables direct comparison with other measured properties.Can a blower door test help reduce heating bills?+
Yes — uncontrolled air leakage is one of the single largest hidden heat losses in UK homes. A typical Victorian terrace can leak 10–20 air-changes per hour at 50 Pa; tightening that down to 3 ACH50 (a realistic retrofit target) reduces heating energy by 15–30 %. The blower door test quantifies your starting point and lets us prioritise the highest-impact air-sealing works.Can blower door testing help identify draughts?+
Yes. Cold draughts are uncontrolled air movement driven by pressure differences across the envelope. The blower door amplifies these pressure differences so every draught becomes locatable with a smoke pen — even the small ones you do not normally notice but which add up to 30–40 % of your heat loss. We document each one with photographs and a written remediation order.How does adding thermal imaging improve a blower door test?+
Yes — combining the two is the most diagnostic surveying technique available. With the blower door running depressurised, cold outside air is pulled through every leakage path; the thermal camera reveals those cold inflow plumes as bright cold fingers of air pushing into the warm interior. This pinpoints leaks that smoke alone cannot find, such as flanking air paths inside intermediate floor zones or stud walls.How long does a blower door test take?+
A standalone airtightness test takes 90 minutes to 2 hours including setup, temporary sealing of intentional openings, the calibrated test run, smoke-tracing and removal. A combined Home Health Diagnostic Survey (blower door + thermal + smoke + moisture) takes 3–4 hours on site plus 2–3 days for the written report.Do windows and doors need to be closed during the test?+
Yes — all external windows and doors are closed during the test (apart from the door holding the blower door fan). Internal doors are left open so the test measures the whole envelope as one volume. Intentional ventilation openings — trickle vents, extract fans, MVHR ducts, open flues — are temporarily sealed before the test and re-opened immediately afterwards.Should heating be on before the test?+
For airtightness measurement alone, heating does not need to be on. However, if the test is combined with thermal imaging (which we always recommend), we need at least 24 hours of stable heating beforehand so internal surface temperatures are settled. We will confirm the heating regime needed when we book the appointment.Can smoke testing be used during a blower door test?+
Yes — smoke is the single most useful add-on. Under depressurisation a smoke pen held near a suspected leak shows the air drawn through the gap; under pressurisation the smoke is pushed out. We use a combination of smoke pens (precise, low-volume) and theatrical fog (whole-room visualisation) depending on the situation.What happens after the blower door test?+
We compile the data into a written report containing the air-change rate at 50 Pa (n50/ACH50), the volumetric leakage (m³/h at 50 Pa), the calculated permeability (m³/(h·m²) at 50 Pa for Part L), a photographic + thermal leak inventory, and a prioritised air-tightening plan. The report is yours to share with architects, contractors or surveyors.Do I receive a report after the test?+
Yes — a full written report with the measured airtightness figures, the leakage inventory, photographs of every meaningful leak path, and a costed prioritised remediation plan. The report follows the ATTMA TSL1 format and is acceptable evidence for Part L compliance, Passive House certification, EnerPHit and insurance claims.Is blower door testing useful before insulation works?+
Yes — it is essential. Adding insulation to a leaky envelope is one of the most common (and most expensive) retrofit mistakes. The insulation cannot perform if cold outside air is bypassing it through gaps and penetrations. A pre-retrofit blower door test identifies every leakage path so they can be sealed *under* the insulation, not on top of it.Is blower door testing useful after retrofit works?+
Yes — verified outcomes are the whole point of the 'Verify' stage in our diagnostic process. A post-works blower door re-test under the same protocol measures exactly how much the airtightness has improved (e.g. from 9.2 ACH50 down to 3.4 ACH50) and produces documented evidence for the client, the architect or the Passive House certifier.Can airtightness problems cause condensation?+
Yes — and this is one of the most underappreciated mechanisms. Warm moist indoor air carried through air-leakage paths into the cold loft or wall cavity carries vapour with it; when that air cools below dewpoint inside the cavity, the vapour condenses on cold structural elements (joists, rafters, the back of plasterboard). The resulting interstitial condensation is invisible from inside the room but slowly destroys timber, plaster and insulation. Airtightness is therefore a moisture-control measure as well as a heat-loss measure.What is a good airtightness result for a UK home?+
For context: a leaky Victorian terrace typically tests at 8-15 ACH50. Approved Document L requires new builds to achieve 8 m³/(h·m²) at 50 Pa or better. AECB Silver target is 1.5 ACH50. Passive House requires ≤0.6 ACH50. EnerPHit (Passive House retrofit standard) is 1.0 ACH50. A realistic retrofit target for an existing London property is 3-5 ACH50 — achievable, transformative and significantly cheaper to heat.Do you do blower door testing across all London postcodes?+
Yes — we cover every London postcode (E, EC, N, NW, SE, SW, W, WC) plus Essex, Kent, Surrey and Hertfordshire. Our equipment is van-mounted and tests can be arranged with 7-14 days' notice for most projects.
Weighing this up against the alternatives?
Independent, building-physics-led comparisons from our knowledge base — written to help you understand the difference before you decide which survey or approach you actually need.
- Thermal Imaging vs Blower Door TestingThermal Imaging
- Blower Door vs Smoke Testing for Air LeakageBlower Door & Airtightness
- MVHR vs PIV (Positive Input Ventilation)Ventilation & Indoor Air Quality
- Heat Pump vs Gas Boiler: The Fabric-First ViewHeat Pumps
Common problems we diagnose
The symptoms that most often lead homeowners to a blower door testing. Each guide explains the building physics behind the problem — and how we diagnose the real cause before any work begins.
- Why is my house always cold?
- Why is one room colder than the others?
- Why do I feel cold even when the room is warm?
- Why is the room above my garage always cold?
- Why is my kitchen or bathroom so cold?
- Why is my hallway and stairs so cold?
Part of one connected building-performance journey.
Every Retrofit IQ service is one stage of a single methodology — Investigate → Design → Verify. Explore how this service connects to the wider network of diagnostics, engineering and quality assurance.
The engineering and quality-assurance services that most often follow this one.
One company. One process. One point of responsibility.
We don’t simply identify problems. We investigate, diagnose, design solutions, carry out the work and verify the results. Book a Home Health Diagnostic Survey and we’ll tell you exactly which remedial works (if any) are actually needed.
Commission a Retrofit IQ Building Physics Assessment
After this investigation, you can commission a Building Physics Assessment for an advanced engineering analysis. A standard survey identifies the problems; this uses advanced building physics modelling to predict how your building is expected to perform after the proposed upgrade — before any work begins.
Most contractors recommend insulation. Retrofit IQ predicts how your building is expected to perform first.
Investigate → Diagnose → Design → Remediate → Verify
RetrofitIQ is not only a diagnostics company. We take projects from first investigation through to verified improvement — and you decide how far we go. Engage us for an investigation on its own, an investigation plus targeted remedial works, or a complete building-performance and retrofit project.
A measured diagnosis — thermal imaging, blower door testing, moisture and building-physics analysis — with a clear, costed report you can act on however you choose.
We investigate, then carry out targeted remedial works — airtightness, insulation, ventilation or thermal-bridge corrections — and verify the result.
A full fabric-first, Passive House-informed retrofit from diagnosis through design, installation and verification — one accountable team, one point of responsibility.
- Airtightness improvements & draught-proofing
- Internal wall insulation (IWI)
- External wall insulation (EWI)
- Loft & roof insulation
- Suspended floor & underfloor insulation
- Thermal-bridge detailing & correction
- Extract ventilation & MVHR installation
- Soundproofing & acoustic upgrades
- General building-fabric improvements
Evidence from Real Projects (11)
Real project and investigation images from our own fieldwork, matched to this page — not stock photography.

Calibrated blower door fan installed in the front doorway, sealed with the red airtight pa

Sample Building Performance Investigation Report — Thermal Imaging
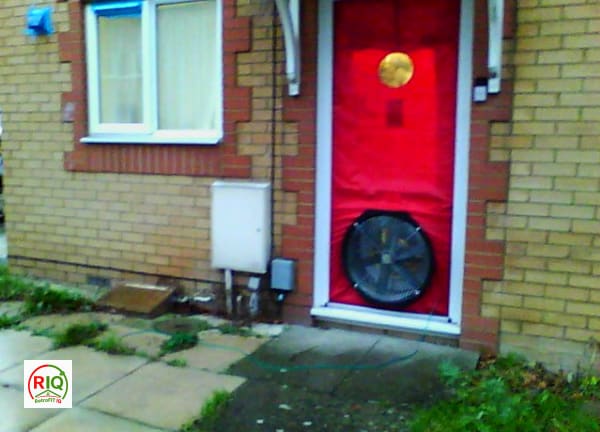
Blower Door Airtightness Test Setup
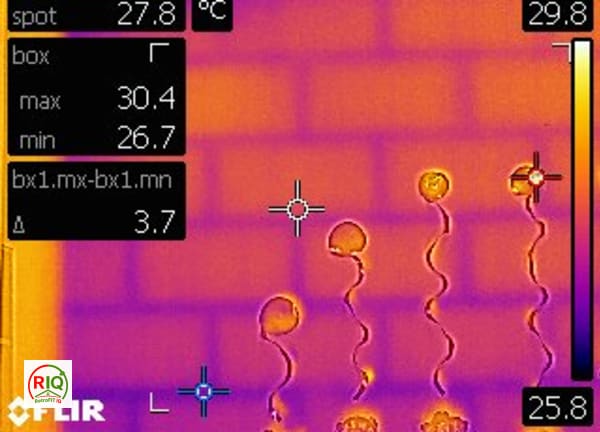
Thermal Bridging Visible Through Masonry Blockwork Wall

Airtightness Testing in a Stratford Victorian Terrace

Ceiling / external-wall junction
No related investigations yet.
Browse all investigationsBlower Door Testing across London & the surrounding areas.
Explore building performance diagnostics, damp and condensation investigations, airtightness testing and retrofit advice in your area. We cover London, Greater London, East London, Essex, Kent, Surrey, Hertfordshire and the surrounding counties.